As we’ve been working with different artists, we keep running into the headaches of keeping all their bio links updated. Since at vyb we have your email signup, music, merch, and everything else, we decided to make a free Link-in-Bio Tool that you can easily use. Like our free email list sign-up landing pages, we are making life easier to stay connected with yoru fans and give them an easy way to access everything you have.
Our tool will automatically populate based on your content on vyb. For example, as soon as you make your first merch item, the merch store button will automatically populate. Have any upcoming events? The event link button will auto-populate. No more having old, stale links.
The service is 100% free. Because we win when you win.
Here are the steps to configure and use this yourself.
Step 1. Navigate to Link-in-Bio on your Dashboard.
First click on “My Dashboard” and then click on “My Link in Bio”
You will see your current Link In Bio.
From here, you can copy the link to it or update it.
Next click “Update Link in Bio” button to start configuring it
Step 2. Select Social and Music Platforms
Now simply select all the social and other content sites that you want. These will show up as icons underneath your name in your bio for easy access
Note that you can also add a generic button to your Link in Bio if you want something to be more prominent.
Step 3. Edit URLs for the selected links and Your Image
Next enter in the URLs for each of your social and music platforms.
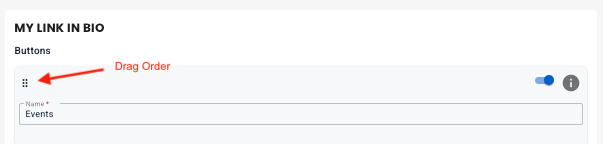
Now re-order these links by selecting their icon and dragging it.
On the right hand side you can replace the picture that shows up on the top of your Link in Bio
Step 4. Edit Buttons
We have pre-populated your Link In Bio with links to everything in your vyb account. You don’t need to manually add those at all. You can change the name, but realize that each of these is preset to always go to that service. For example Merch button will always go to your vyb merch store.
Now you can drag the buttons to re-order them.
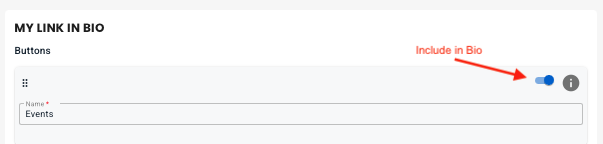
Next, you can also include or exclude any default button, but know that if you don’t have any content in that area we will auto-hide it anyway. For example, until you post some GoLives your GoLive button will be hidden.
Step 5. Add Custom Buttons
Next, if you want to add your own custom buttons, click “+ Add Button” to add your own button. Give it a name and a URL
Step 6. Style Your Link-in-Bio
Now choose one of the preset themes at the top for an initial starting point.
Next you can change the overall change background color, your name text color and font
Edit the button styles, picking color, font and transparent or solid.
Finally, when you are done, click “Save” and you are done editing.
Step 7. Add your Link-in-Bio to your Instagram and other Platforms
Finally, it’s time to go live and use your new Linke-in-Bio! Back on the main Link-In-Bio dashboard page, copy the link.
Paste this into your Instagram and all other services to give a one stop place for your fans to get to you.
In vyb we make it simple to send email notifications to all ticket holders from your event. Maybe you need to tell of a time change, parking instructions, a line-up change, or just simply want to tell all your fans you are excited to see them at the event.
Below are the steps to email all the event ticket holders:
Navigate to My Dashboard
Click “My Created Events”
Click Action menu
Click “Email Attendees”
You’ll get a pop-up where you can add your own subject line and message. We have pre-populated some text for both, but feel free to edit this as you see fit.
Once you have the information you need, simply press send and we’ll take care of the rest! All ticket holders will receive the email.
While most GoLives can be done as spur-of-the-moment recordings from your phone, sometimes you want to use footage you’ve already created and get some buzz for your fans. In vyb you can upload any footage and schedule when it will GoLive. This is especially great when you want to create some buzz but can’t do multiple GoLives, just take existing footage and schedule out your whole campaign. Now, this means that you can’t react to comments, so just remember that.
Here are some ideas:
Go back through your old videos, what do you have from significant moments in your career?
If you are recording a new album, take some videos during the recording process. Make some teaser videos and schedule them out to build hype to your release
Stitch together cool moments from your shows in a video montage showcasing the energy of your live performance.
To upload and schedule a GoLive, follow these simple steps:
Step 1. Navigate to GoLive in your Dashboard
Select “My GoLives” in your Dashboard
Step 2. Select “+ Upload GoLive Video”
Just like a regular GoLive, edit the title and Audience. Don’t stress too much on these, you can always change them from the Action menu under your GoLive dashboard.
Step 3. Set Your Source
For the source, you can set a Thumbnail image. This is purely optional.
Upload the video by selecting from files on your device.
Step 4. Schedule your GoLive
By default, your GoLive will publish immediately. You can change the date and time to anytime in the future.
Use this feature to upload multiple videos and schedule them out.
Once your are ready, press the “Upload GoLive” button.
Make changes if you need
That’s it! Make scheduled GoLives part of your campaign to build buzz with your fans.
If you want to change the date or title of the video, simply use the Action Menu next to the show.
If you are a label or a manger, we have given you special features and access to extra data on your artists.
Here are the steps to setup your account:
Step 1: Signup to vyb
After selecting Signup for new account, choose your account type, either label or manager
Step 2. Fill in basic account information
Just like an artist profile, fill in the basic account information. Don’t worry, you can always go back and edit this later if you want to make changes.
Step 3. Invite Artists
Click “+ Add Artist” and then add the artist name and their email.
If your artist is already on vyb, we’ll email them to accept your invitation.
If the artist is not on vyb, we’ll take care of emailing them and inviting them to the platform to complete their profile.
Step 4. Artists accept their invitation.
Your artists will receive an email like this one, inviting them to the platform. If they are an existing vyb artist, then they can simply accept or decline the offer.
If they are not on vyb yet, clicking “Accept” will take them through an onboarding process. They don’t need to complete their profile, they can simply make a start and save it as draft.
Step 5. Monitor Artist signup process in your dashboard
In your dashboard under “My Artists” you can see all the artist you have invited to vyb.
Invite Status: shows if they have accepted or declined your invite. If the status shows “Invited” that means they have yet to take action
Account Status: shows you the status of their profile, either “Draft” or “Completed”. If is says “Completed” this means they have published their account.
Step 6. Add Other artists from your dashboard
From that same dashboard you can add additional artists to the platform. Under the Actions you can delete a connection to an artist if they are no longer affiliated with you.
Once an artist has accepted your invitation, their profile will automatically get a link to your manager/label page
This is how you set your profile and invite artists. As always, email us at help@vyb.co with any questions or suggestions.